With Portal 9.1 Feature Pack 1, which was released just over a year
ago, came a new feature I finally got the chance to use. Unified
Navigation. In this post I’ll walk through setting this up in one of my
demo environments.
Using the Unified Navigation WorkCenter makes configuring this
feature pretty easy to set up. And it certainly does seem to take care
of the mess of managing security and content references between all your
systems. Oracle has put quite a bit of effort into making the
configuration of Integration easier. With the introduction of the IB
Network WorkCenter, configuration of IB has been simplified. Setting up
Unified Navigation leverages the IB Network WorkCenter and the new
Unified Navigation WorkCenter.
Before getting started, lets go over a few details. Keep in mind I
am not an Oracle representative and the information I’m providing in
these next bullets is only rehashing item’s I’ve seen in information
published by Oracle.
1. Unified Navagation requires a full fledged license of PeopleSoft Applications Portal if your running PeopleTools 8.52.
2. PeopleTools 8.53 modified the limited use license for PeopleSoft
Applications Portal so starting with 8.53 you can now use Unified
Navigation for free if you own PeopleTools 8.53, I don’t know if this is
retroactive back to 8.52 or not, talk to your Oracle rep. or just
upgrade
3. There are several limitations in 8.52, I’ve not found
documentation indicating that there was any change to these limitations
in 8.53 yet. These are described in more detail in the
PeopleSoft Applications Portal 9.1 PeopleBook: Portal and Site Administration
- The full license was originally needed and may still be required.
- Unified Navigation is not supported as a pagelet, although a pagelet does show as available, documentation indicates it is for use in the WorkCenter only.
- Navigation to the content providers is supported through the drop-down menu only.
I’ve worked several places where clients have disabled the drop-down
menu for their own reasons. A lot of the time this is because they
still have pre 8.50 releases and want to keep a more uniform appearance.
- Some files may need to be copied to the portal system: Any remote
pagelet icons needed and CSS files (only if the portal and contenent
provider don’t use the same style)
- Unified Navigation is only supported for like portal types (EMPLOYEE
to EMPLOYEE, CUSTOMER to CUSTOMER, etc. not EMPLOYEE to CUSTOMER)
- Character limitations on remote folder names are: { } #
- Can not add subfolders to a unified navigation remote folder (it looks like you could do that, but it’s not supported).
- Templates for remote CREFs and remote Dashboards need to conform to standards that are outlined in the Applications Portal 9.1 PeopleBook: Portal and Site Administration
4. Documention indicated that this function could work with Content
Provider systems at 8.50+ however other information points to all
systems needing to be at least 8.52.02 or later.
Okay, on to the real work.
I will be assuming that your environment is already functioning in a
pre 8.52 state. That is, that IB is setup properly to do the following:
- Gateway(s) are setup properly
- Nodes are configured and authentication type is set
- Single Signon is already configured and working
- Old methods of Portal Navigation already work
Before I started I did some sanity checks on my environment. Could I
ping all nodes and did the original method of Single Signon work? I
used the
PeopleSoft > Financials Supply Chain PT8.4x link to test and it popped me right in to Finance just like I would expect. Also I tested the
Portal Administration > Test > Single Sign On > User Profiles link for my content database. Another success, with that we should be good to start.
Some additional configuration steps are required before we move forward.
- Ensure the authentication domain matches for all systems involved
- Unified Navigation requires the “generate relative URLs” option be
turned off on the Virtual Addressing page of the web profile in use.
This is on by default in all the delivered web profiles as far as I
know. Disable it on all systems involved and restart the web server
or use the reloadconfig command if you have that set up.
- All systems require the drop-down menu to be enabled, as previously
stated it only works with the drop-down menu, not the pagelet menu on
the left hand side. Enable it if you have disabled it.
- On the content provider side a default user id must be set on the
ANONYMOUS node, the user should be in both the content and portal
system. Oracle recommends that it be a very low priveleged user. This
also could impact pre-existing configuration required for integration.
If your not already using the ANONYMOUS node, I recommend creating a new
user for this purpose. Give this user id access to run the
PTUN_SSOTESTER service operation.
- On the portal side, create a new node for the PTUN_SSOTESTER sevice
operation, copy an internal node to fulfill this. The settings should be
confirmed: active = yes, segment aware = yes, authentication option =
none, WS Security authentication token type = none, routings = none.
Once the node is created, create an outbound routing for the
PTUN_SSOTESTER service operation to your new node. Deactivate the
routing to the WSDL_NODE if it is activated.
1, 2, 3, I took care of easily enough. For 4, I created a new
permission list, role, and user specifically for this purpose and
assigned that user to the ANONYMOUS node, changing it from the PSADMIN
user which is delivered. I added the user without any role and
permissions to the portal system.

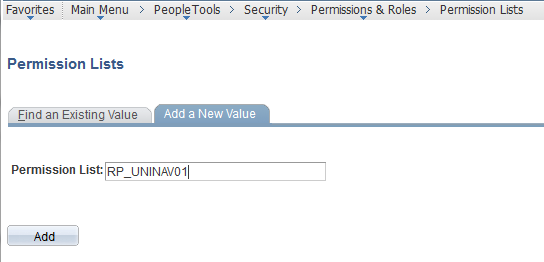
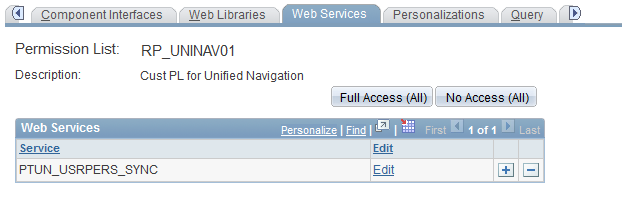
Create a Permission List

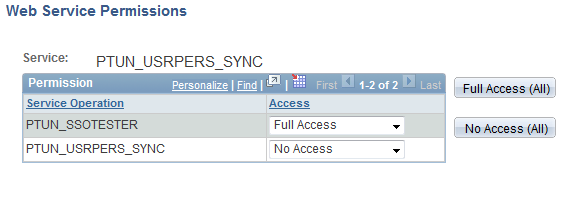
Add the PTUN_USRPERS_SYNC Service

Edit the Permissions and set PTUN_SSOTESTER to Full Access

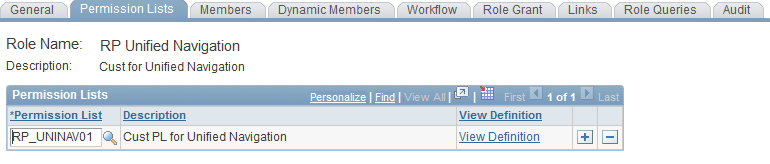
Add the new Permission List to the Role

Add the new User

Add the Role to the User
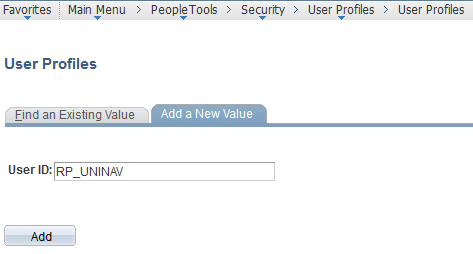
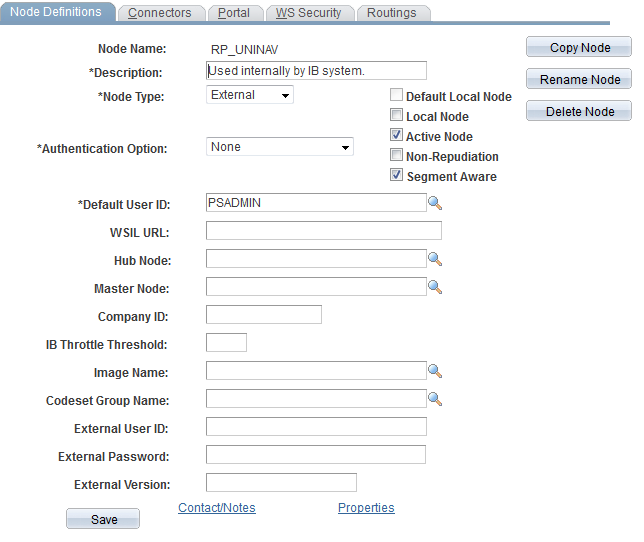
For number 5, I copied the ANONYMOUS node to RP_UNINAV. By default,
the node was active, segment aware, and had an authentication option of
none. The WS Security authentication token type was also none. If for
some reason you’ve changed these on the node you copy from you’ll need
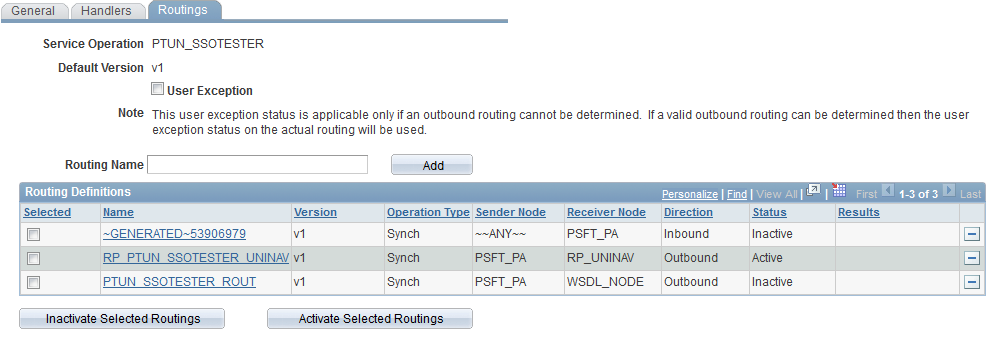
to update them. I verified no routings existed on the node and
proceeded to edit the PTUN_SSOTEST service operation. I inactivated the
existing active routing on the WSDL_NODE and added a routing for my new
node.

Create a new node in Portal

Pull up the PTUN_SSOTESTER routings

Deactivate the WSDL_NODE routing and add a new one for your new Node
In order to proceed further, we need to start making configuration
changes that, at the moment, I’m not that found of, mainly because it
appears we
need to use the new IB Network. I may add reference to why I’m not thrilled with this later.
In both Portal and your Content systems navigate to
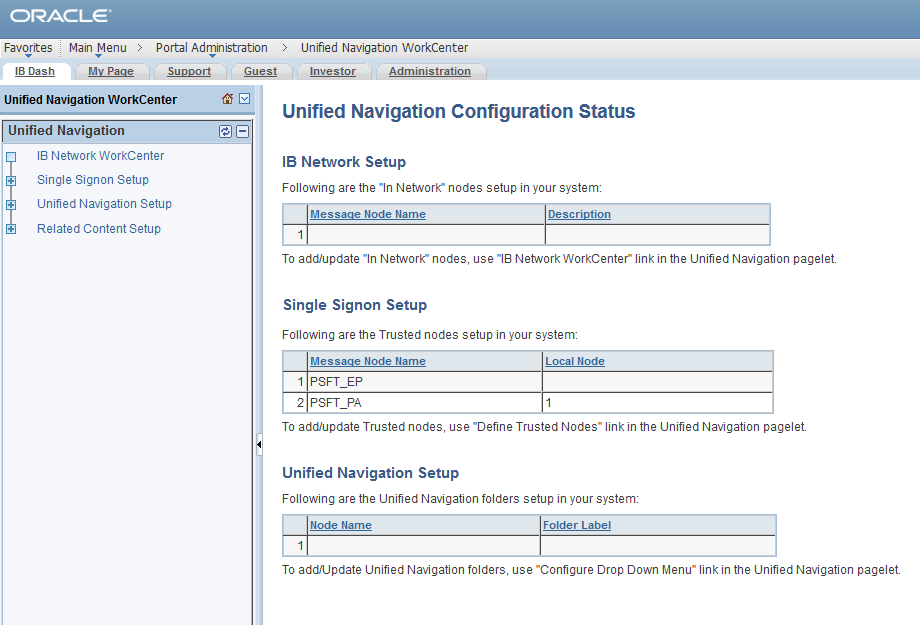
PeopleTools > Integration Broker > Integration Network.
If your like me and this is your first time here, even though things
are running fine, you’ll most likely find that it says the
Node Network is Not Configured.

Click the link, click save on the following screen, return to the
configuration status and things should be good to go. Saving at that
screen officially updates the
IB_NETWORK status for the default local node for the first time if it hasn’t been updated by something else already.

If after returning the status is still not configured, go back and
make sure read the notes at the bottom, at a minimum you must have the
default local node configured and part of the network, the integration
gateway secure keystore must be set, and any nodes configured but not in
the local gateway must have a remote gateway configured. Look to make
sure it’s detecting that your secure keystore is setup properly, there
will be a checkmark in the Secure Keystore Value Defined in the top left
of the page. Last I knew Oracle was still delivering the keystore
password unencrypted and you had to change that to fix it. Going
forward with PeopleTools 8.53 I believe they are prompting you during
install for these passwords.
I’m setting this up in Portal and Finance, therefore, in Portal I
should have PSFT_EP setup as a remote messaging node and ERP setup as a
portal node pointing to Finance.

Conversly in Finance, I would setup PSFT_PA as a messaging node and
EMPL as a portal node pointing back to Portal. I already had this done,
as I said this was an already working environment, so nothing for me to
change here.
Tthe documentation indicates that these Portal nodes must be added to
the new Integration Network facility in order to complete the
configuration. The only way to add them though is to add them to a
Gateway (either local or remote).

This appears to only be required on the Portal side. I added ERP to
the gateway that Portal was using, and then was able to add it to the IB
Network. After I added it to the network it was available to choose
for the Drop Down Menu configuration and SSO test. I did not add EMPL
to a gateway or IB Network on the Finance side and things worked just
fine.

After adding the corresponding portal node(s) to your gateway(s), add
them to the Integration Network. Once that is complete, go to
Portal Administration > Unified Navigation WorkCenter, expand the
Unified Navigation Setup
section and test the single sign-on to the Portal node (ERP in my
case). After the test completes successfully, move on to Configure Drop
Down Menu. Select the portal node reference, you’ll notice, only nodes
in the Integration Network are available for this selection, thus
driving the need to actually add these portal purposed nodes to the
gateway as I mentioned previously. For
Folder Label, specify a name you like, such as,
Finance Menu or
PeopleSoft Finance 9.1. Folder Name
is the content provider menu navigation to share, use the lookup button
and the returned tree to select what to bring over. This allows you to
do partial or full menu, for instance, my example does the full tree,
but you could choose to do three individual subfolders, and set them up
independently.
Local Parent Folder Name is the same as
Folder Name but it’s the corresponding location to place the menu on the Portal side. They are pretty self explanatory.

And here is the final product, note the Fianance Navigation at the
top of the drop down menu expanding all options since I’m logged in as
an admin.

This is a pretty nice update in my opinion. Doesn’t take long to
setup, especially if you already had things working, and is much cleaner
than moving CREF’s and security around to provide navigation.